How to Take a Screenshot on a Laptop: Easy Step-by-Step Guide
Taking a screen shot on a laptop is one of the most useful skills for work, school, or personal use. Whether you need to capture an important document, save a web page, or share a moment from a video, knowing how to take a screenshot on a laptop can save you a lot of time.
In this guide, we’ll cover screenshot methods for both Windows and Mac laptops, so you can easily capture your screen anytime.
How to Take a Screenshot on a Windows Laptop
Windows laptops offer multiple ways to capture your screen. Here’s how you can take a screenshot on a laptop running Windows.
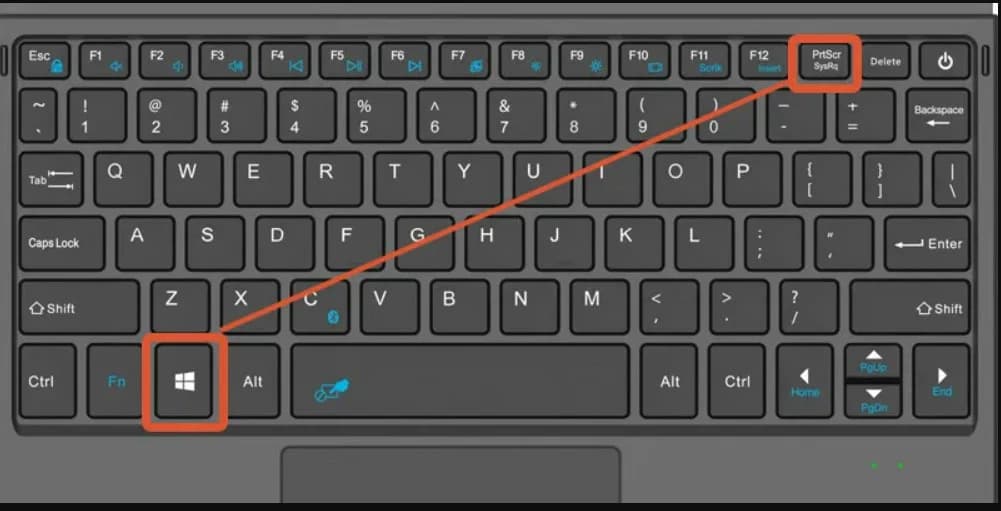
1. Capture the Entire Screen
Press:
Windows key + PrtScn
The screen will dim briefly.
The screenshot is automatically saved to Pictures → Screenshots.
This method is the fastest way to take a screen shot on a laptop.
2. Capture a Specific Area
Press:
Windows key + Shift + S
The screen will freeze, and a selection tool will appear.
Drag to select the area you want to capture.
The screenshot is copied to your clipboard, ready to paste into any app.
This method is perfect if you don’t want to capture the entire screen.
How to Take a Screenshot on a Mac Laptop (MacBook)
MacBooks also make taking screenshots simple. Here’s how to quickly take a screenshot on a laptop running macOS.
1. Capture the Entire Screen
Press:
Command (⌘) + Shift + 3
2. Capture a Selected Area
Press:
Command (⌘) + Shift + 4
This method is ideal for capturing only the part of the screen you need.
Where Your Screenshots Are Saved
If you can’t find your screenshot, check your clipboard or screenshot settings.
Tips for Taking Screenshots on a Laptop
Use Windows key + Shift + S for quick, selective screenshots on Windows.
Use Command + Shift + 4 for area-specific screenshots on Mac.
Screenshots are perfect for tutorials, presentations, or saving important information.
By mastering these shortcuts, taking a screenshot on a laptop becomes fast and effortless.
Final Thoughts
Learning how to take a screenshot on a laptop is essential for productivity. Whether you’re taking a screenshot on a laptop for work, school projects, or blogging, these simple shortcuts make capturing your screen quick and easy.
Once you get the hang of it, screenshots will become a natural part of your workflow.